Laboratory Techniques
|
Introduction
Techniques
Mass:
Weighing
with a
Balance
Analytical
Balance Length: Rulers
Volume:
Liquids & Calibrated Glassware Graduated Cylinders Temperature: Heat, Bunsen
Burners, Thermometers Bunsen
Burners Thermometers Boiling Liquids:
|
In the U.S., the English
or Imperial system of measurement is commonly used. (But it is not used in ~99% of the world’s nations including England.) A
1975 U.S. law, The Metric Conversion
Act, adopted metric values as the preferred system in the U.S., but only for trade and commerce. It
permitted the use of United States customary units in non-business activities. What legally
constitutes trade and commerce, and what is a non-business activity is still
being debated. For
example, a car’s fuel efficiency is reported in miles per gallon; a person's height is given in feet and inches; ice cream is sold by the cup, pint or gallon; weight is measured in pounds; and temperature is reported in
degrees Fahrenheit. However, most people cannot even remember the
conversions for the English system (e.g. one mile equals 5280 feet or 1760
yards). A football field is 100 yards from
goal line to goal line. In
contrast, the metric system, which is used outside of the U.S., is a
decimal system of measurement used by ~99% of the world’s nations. It is a
system where base units are used in conjunction with prefixes to represent
multiples or fractions of 10. Because of its logic and simplicity, the metric
system gained international acceptance with the Treaty of the Meter, establishing the International Bureau of
Weights and Measures. Even the United States signed the treaty in 1875, but
to date the U.S.'s use of the metric system is highly limited eg. 2-liter bottles for soda, cc's (cubic centimeters) in
hospitals plus a few other applications. In science, the metric system is
used almost exclusively, so equipment and instruments in chemistry and science
labs generally measure centimeters, millimeters, milliliters, grams, etc. In
this experiment, you will learn how to safely use a basic variety of
chemistry laboratory equipment and instruments and take measurements. You
will use a balance and determine by mass by difference of various
samples. You will use a “ruler” to measure dimensions that
are straight lines (length and diameter of a cylinder, and the diameter of a
marble). You will use an analog Celsius thermometer to determine
the boiling point of a liquid. You will use a graduated cylinder to
determine the volume of a liquid, and the volume of solids by their
displacement of a volume of water. You will also use a Bunsen burner to produce
a “hot” or roaring flame to boil water as well as producing a “cool” (but NOT
luminous) flame. You will also measure the temperature of unknown liquids
using a thermometer. One
important goal of this experiment is to record measurements correctly which
will depend on the analog scale or digital read out of the measurement tool that
is used, to the correct number of decimal places. Determining and recording
these values is most important since it reflects the limit of the accuracy of
each piece of equipment or instrument used. Balances
are used to determine the mass of a sample. The metric unit of mass is the
gram. Electronic balances can be expensive and very sensitive. They are very
easy to use, but must be used carefully to avoid damage. The most important rule is NEVER place any chemical directly on the
balance pan. Use a beaker, a watch glass, a weighing cup, or weighing
paper to avoid contaminating the balance. There are several types of
electronic balances, and each measures with a different degree of accuracy: ·
An analytical balance measures with an accuracy of ±0.0001 g. ·
A milligram balance measures with an accuracy of ±0.001 g. ·
A centigram balance measures with an accuracy of ±0.01 g. The more decimal places
that a balance provides the more sensitive and expensive the balance. The
balance type determines how a weight (mass value) is reported and the number
of significant figures in the value. SEE: https://www.youtube.com/watch?v=KYJ9l4TghUM The
general procedure for using a closed electronic balance follows: · The
balances are to remain “ON” at all times. · All
balance doors are to remain closed at all times, unless loading/unloading the balance. · Do not
lean on the balance table. (The balance is sensitve enough to measure vibrations
on the countertop due to students leaning on it.) · Material
to be weighed should be placed in a container on the balance pan. The container
may be either pre-weighed or “tared” (as explained below). · Before
weighing be sure doors are closed and the display reads 0.0000 g (four zeros past the decimal point) for an analytical balance, 0.000
g for a milligram balance, and 0.00 g for a centigram
balance. If zeroes are not displayed on the scale, gently click the front
lever until the balance displays
zeros. If the number displayed continues to drift, consult your instructor or
the lab staff. · To
weigh an object, open the door, and carefully place the item on the center of
the pan. Close the door and wait for the digital readout to stabilize (the
green light to the left of the readout
will go off). Read and record all the numbers in the digital readout. (Never round any numbers
reported on any electronic instrument.) Remove the item and close
the doors before leaving. · When
using a container to hold chemicals, you may tare the container as
follows. Place the container in the center of the pan. Close the doors.
Briefly click on the front lever to zero the balance. The container is now “tared out”, and the balance is set to
read the weight of any material added to the container. Remove the container
from the balance, add material to it, and carefully place the container back
on the center of the pan. (Do NOT re-zero the balance during this process.)
Close the door and read the digital scale when stabilized as before. After
you have removed the container, shut the doors and gently push the front
lever to remove the tare and return the scale to zero. Rulers: The basic metric unit of length is the meter,
but the length of most objects in a chemistry lab are measured in centimeters
(cm). A centimeter equals 0.01m or 1/10 of a meter, so 1m = 100cm—just
like 1 dollar = 100 cents (since one cent is equal to 1/100 of a dollar). When a
measurement is taken with an analog device like a ruler, the measurement is
always recorded to one more decimal place than the smallest markings on the
instrument. In the following example, the centimeter ruler shown has numbers
marked for each centimeter (cm),
and the 10 smaller markings between each number representing 0.1 cm or one
millimeter (mm). On some rulers, the “0” cm mark is not at the
end of the ruler, so the ruler is still accurate even if the ruler becomes
rounded at the end. The length of an object is measured by placing the object
at the “0” mark.
When
the measurement is taken, all the digits are known with certainty, but the
last digit (which is between markings) must be estimated. In the example
above, the length of the gray object is clearly between 8.2 and 8.3 cm. Since
the object is halfway between 3.2 and 3.3 cm and the last digit is estimated.
Possible measurements are 3.25 cm,
3.24 cm, or 3.26 cm, depending on whether the rod is seen as being
exactly halfway, just to the left of halfway, or just to the right of
halfway, respectively. Reporting any one of the values is acceptable. When
an object lines up exactly with a marking on an instrument, the estimated
digit is 0. In the following example, the end of the gray object appears to
line up with the marking for 4.5, so the length can be recorded as 4.50 cm. If the end appears to
be just to the left or to the right of 4.5, it is recorded as 4.49 cm or 4.51 cm, respectively.
Graduated cylinders are used to hold and deliver measured amounts of
liquid. They are available in many sizes—e.g., those used in this lab can
hold a maximum of 10 mL or 100 mL of liquid respectively. To insure the
greatest accuracy one should use the smallest graduated cylinder that will
hold the entire volume of sample within the scaled portion of the cylinder.
For any graduated cylinder to be used accurately, it must be level (sitting
on the counter, NOT handheld).
Note that the graduations on all cylinders are read from the bottom
up—that is, they indicate the volume contained in the cylinder. The 100 mL graduated cylinder has a number every 10 mL and shorter
lines every 1 mL.
Given the large space between the markings on a graduated cylinder, one can
estimate between the markings, so the volume can be recorded to 0.1
mL.
Bunsen burners are often
used in a Chemistry laboratory to heat solids and solutions quickly, which
raises their temperature. The burners can be controlled to produce hotter or
cooler flames. Unlike hot plates, burners can be turned off immediately once
a sample is heated. Consider the image of one
type of Bunsen burner below.
Below the base there is
usually a control for the amount of gas going into the burner. Some
models do not have this control. Air inlet The body of the burner
is called the barrel, and can
be twisted to adjust the size of the air inlet, at the bottom of the
barrel. Controlling the amount of gas
coming into the burner determines the overall size of the flame. The burner’s
air inlet, which is adjusted by
screwing or unscrewing the barrel
of the burner, determines the amount of air that mixes with the gas. The larger
the air opening, the more oxygen the flame receives, and therefore, the
hotter the flame. The fuel used for the
burner is commonly natural gas, which is a mixture of flammable hydrocarbon
gases containing mostly methane (CH4). Each lab work area has a natural
gas jet. Each gas jet must be shut off completely when the burner is not lit.
Always check the rubber tubing of the burner for holes. The heat (energy)
produced is from the gas reacting with the oxygen in air and is transferred
to the object being heated. The object’s temperature can become very high.
Skin contact must be avoided.
If the air inlet is
completely closed when the burner is lit, the flame will not get very hot, so
the gas does not burn completely and produces CO and soot particles which
incandesce to a large and luminous flame (see
below). A luminous flame can be dangerously flimsy, making it almost
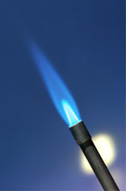
impossible to control and a hazard in the lab. Thus, a luminous flame will NEVER be used in lab. If the air
control is adjusted so enough air mixes with the gas before it gets to the
flame, the methane burns more completely, indicated by a “hot” blue flame
(see below).
A
Bunsen burner can be dangerous, particularly if used carelessly. Awareness is
critical! Know whether or not the gas valve (on the lab bench) is open or
closed. Always be sure the valve is closed when not using a burner and when
leaving lab. Be aware of any flammable materials (including hair and
clothing) that are near the burner flame. NEVER leave a flame unattended!
SEE: https://en.wikipedia.org/wiki/Temperature
|